In garages or workshops, in order to save money, often instead of an expensive boiler, a furnace is installed for working out: they process metal parts with their own hands, weld them and get a model resembling a "stove." However, when choosing a design for manufacturing, one may encounter difficulties. Do you agree?
We will tell you how to choose the optimal scheme and assemble an economical, but very effective heating device with your own hands. In the article we proposed, the popular options are examined in detail, the action of which is tested in practice. Tips for the construction and subsequent operation of the stove are given.
What is oil mining?
Waste oil or waste oil is a product that remains as a result of the operation of an automobile engine. Motor, transmission or other industrial oil accumulates in large quantities at service stations, car workshops, as well as from ordinary car owners.
In the process of use, the oil loses its useful qualities, accumulates salts, slags, resins, the smallest metal particles, however, people have found use for such an illiquid product.

It is forbidden to drain the waste into the ground, since a product most dangerous to nature completely destroys all living things. Alternative - delivery of waste material to special collection points for further processing
In small quantities it is used for household needs:
- lubricate a working tool (for example, chainsaws);
- impregnate wood (sleepers for railways);
- lubricate the rubbing parts of light vehicles (scooters, bicycles);
- used as a fire-fighting fluid;
- cover bitumen coated surfaces.
As at the end of the last century, mining is used as fuel for stoves installed in conditionally residential premises - garages, utility rooms, workshops. If you build a stove yourself, then with constantly replenishing stocks of used oil, heating the room will be almost free.
Other effective ways of organizing economical garage heating are presented in an article that is fully devoted to this issue.
Why are used oil ovens popular?
The main reason for the people's love of home-made stoves is the low (or zero) cost of the unit itself and the fuel for it. Some homegrown master craftsmen make such heating devices as an experiment and at the same time a useful device.
With the advent of a home-made furnace on waste oil, the solution to the question of “building up” recycled materials disappears.
For especially advanced craftsmen, the manufacture of off-site garage furnaces has become another business option. They design custom models and sell them to interested but not so skilled garage owners.
How does the unit work at working out? The process consists in splitting heavy fuel with impurities, which has a rather complex composition. In another way, the process in which there is a lack of oxygen and combustion of not the fuel itself, but its vapor, is called pyrolysis. The principle of operation of pyrolysis equipment is described in our recommended article.
To start the process, it is necessary to evaporate the fuel, then heat the resulting vapors to a temperature of about + 300-400 ºС, after which the combustion will be carried out spontaneously. It remains to wait for the complete combustion of the fuel.
There are 2 schemes that are used in the independent manufacture of furnaces:
- filling the tank with oil and setting it on fire, as a result of which the vapors evaporate and begin to burn;
- the use of a burner in which the three zones (pyrolysis, ignition and afterburning) are combined and make the combustion process more efficient, adjustable and safe.
The second scheme is more complex, requires serious refinement of the fuel and manufacturing accuracy, so we will consider simpler models from the first group.
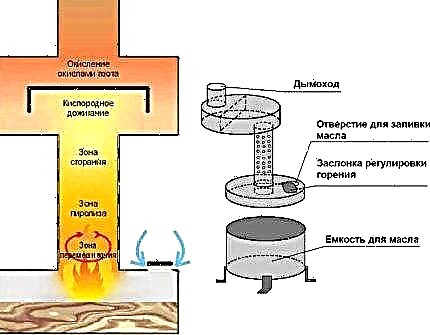
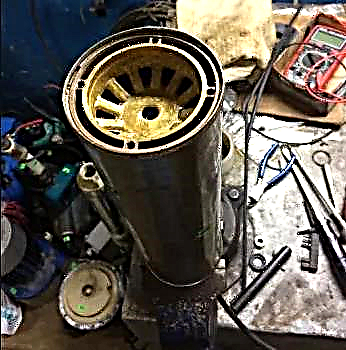
The scheme of the device is a simple model of the furnace for testing. The air necessary to support the combustion process enters through the throat with a damper. The same damper can partially control the burning force.
The advantages of using an oil working garage stove:
- simplicity of design and maintenance of the device;
- fuel economy - about 1.5-2 liters per hour;
- lack of soot and soot;
- safety of storage of mining reserves;
- it is possible to connect an air or water heating circuit;
The compactness of the unit is also extremely important for small rooms.
Disadvantages are also available:
- the need for regular cleaning of the stove and chimney;
- Mandatory element - a vertically laid chimney with a height of at least 4 m;
- for furnaces with nozzles, only refined oil should be used (approximate cost of the filtered product is 8-12 rubles / l);
- one of the conditions for storage of mining is plus temperature, that is, it is necessary either a room heated in winter, or a tank buried in the ground.
Before manufacturing / purchasing a finished furnace or boiler for testing, it is necessary to consider all the pros and cons of home-made devices, and then make the final decision.
DIY projects
There are a lot of options for manufacturing furnaces for mining. They are made from metal blanks or used containers (cylinders), with pyrolysis and turbo burners, with drip feed or blow. We will focus on two popular models, which are more suitable for self-construction and assembly.
Sheet metal model
In garages and in the surrounding area you can often find unnecessary metal parts, cast-iron plates, steel sheets, pipes. Among them, there are probably several items suitable for welding the stove.
For example, to make a simple model, you need the following material:
- old steel sheet 3.5 mm thick;
- a piece of steel pipe with a wall thickness of 4.5 mm;
- tin pipe for a chimney with a diameter of 110 mm.
In addition, you will need a tool that is usually available for any garage owner: a welding machine with electrodes, a circular saw with cutting and grinding discs, a hammer, and pliers. Mandatory - a set of working protective clothing for welding with glasses and gloves.
Before the welding process, we prepare part of the parts.
Image Gallery
Photo from
Metal blanks by size
Steel or cast iron pipe
Drilling holes in the pipe
When part of the parts is prepared, we proceed to welding, but we do not remove the circular saw far - it can be useful for cutting or cutting off individual fragments.
Image Gallery
Photo from
In a metal blank for the combustion chamber, cut out a window that will simultaneously serve to fill the oil and adjust the burning force
To the other end of the same workpiece we weld a burner (pipe), and then the walls and the bottom. As a result, a brick-shaped chamber welded at all joints should form
In a similar way, we weld a second chamber from individual billets, which will act as a stove, and then weld the burner on one side, and on the other a pipe section for the chimney
Pre-prepared legs (4 pieces) are welded to the bottom panel of the chamber, designed for filling the working out. We make sure that the length of the legs after welding remains the same
We install the finished oven in a previously prepared and cleaned place. A good option is at the entrance, near the wall, as the chimney will be led out through the wall.
We take the elements of the tin pipe (straight, angular) and assemble from them the structure, part of which will be indoors, and part brought out
We take a piece of the chimney pipe, substitute it to the wall in the zone of the intended exit and circle. Punch a hole in diameter (slightly larger than the diameter of the pipe) with a drill or perforator
We weld the inside of the pipe to the stove, a small horizontal element is brought out through the wall to the outside and fixed to the garage wall the rest of the pipe (using clamps)
Step 1 - the design of the upper part of the chamber for testing
Step 2 - welding the exhaust chamber and welding the burner
Step 3 - Welding the Plate and Welding to the Other Parts
Step 4 - welding the legs to the lower chamber
Step 5 - installing the stove in a permanent place and fitting
Step 6 - making a chimney from a tin pipe
Step 7 - making holes in the wall for the chimney
Step 8 - welding the chimney to the chimney and out
To prevent rainfall and debris from falling into the chimney, we fix the cap on the end with screws. The safe height of the chimney is about 4 m. The combustion products discharged above the roof will quickly disperse in the atmosphere and will not harm people or plants.
After the completion of assembly and installation works, it is necessary to test and, if flaws are found in the work, try to fix them. We check the quality of combustion in the following order.
Image Gallery
Photo from
Stage 1 - filling the used oil into the combustion chamber
Stage 2 - Matchstick Oil Burning
Stage 3 - checking the combustion and heating of the furnace
Stage 4 - checking the functionality of the stove
In the process of designing and welding, the following errors can be identified:
- too thin walls of chambers and pipes (rapid wear, inability to retain heat for a long time);
- not large enough hole for filling oil and adjusting the burning force;
- poorly selected installation location of the furnace;
- different diameters of the furnace pipe and chimney (you will have to use an adapter to connect);
- inaccurate sizes of parts for welding (seams will be loose and will not last long);
- ignition with gasoline - an explosion is possible, it is better to use solvents (white spirit and the like).
If you cook the stove according to the rules, it will last a long time and will easily heat a room with an area of 20-30 m². An article on this difficult issue will familiarize you with the options for organizing heating at work.
How to make a gas cylinder stove?
The second option, which became popular thanks to a successful assembly scheme, is an oven made from a conventional gas cylinder, free of contents.

You can connect a heat exchanger with a homemade air swirl and a fan to the body from the cylinder, and use a freon cylinder as an oil tank
First, we make a diagram of the furnace.

Construction details: 1 - base of the case; 2 - perforated pipe; 3 - pipe heat exchanger; 4 - a partition; 5 - visor; 6 - evaporator for oil; 7 - coupling; 8 and 10 - tube for supplying mining; 9 - ball valve; 11 - reservoir for mining; 12 - swirl; 13 - fan
The volume of the cylinder is 50 liters. The wall thickness of the metal pipes is 4-5 mm, the internal section is 100 mm. For the partition between the two chambers and the manufacture of the visor, it is better to use pieces of metal sheet with a thickness of at least 4 mm. As a reservoir for the oil from which evaporation occurs, a brake disc is used.
Oil enters the evaporator through a ½ inch pipe. Part of the pipeline above the ball valve can be flexible to ensure ease of installation. The ball valve is installed so that it is always possible in an emergency to shut off the fuel supply. For the manufacture of the swirler selected a pair of metal corners welded together.
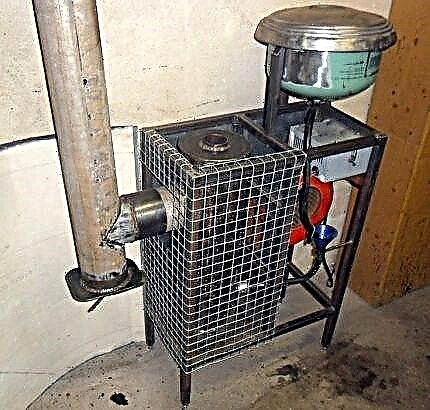
Next, we will consider how to make a compact waste oil furnace for a utility room or garage.
Image Gallery
Photo from
Before starting work, we release the remaining gas from the cylinder, leaving it for a while with the valve open, and then remove the condensate by drilling a hole in the bottom and washing the inside with plenty of water
On one side of the body of the future furnace we cut out two different-sized openings: in the upper part, which is larger in size, there will be a combustion chamber with a heat exchanger, and an evaporator will be located in the lower part. Then you can rinse the inner walls again with water
Cut a round billet from a metal sheet 4 mm thick along the diameter of the body. In the center of the workpiece, we make a hole for the burner, also round
For the manufacture of the burner we take a steel pipe with a diameter of 100 mm and a length of 200 mm. So that it functions correctly, we drill 10 mm holes over the entire surface. Grind the surface and edges. We weld the burner to a metal circle, which is installed between the chambers
We take a brake cast-iron disk and make the bottom - we weld a steel circle. On the other hand, we weld the lid, but so that there is a gap for air intake and the necessary traction
To make an adapter coupling between the burner and the pan, we cut a small fragment from the 100 mm pipe. Install it on a pallet without welding to the base
We make a hole just above the pallet, insert a metal tube for oil supply into it and weld it. For an emergency stop of the mining supply on the pipe, we install a valve - a ball valve
We weld a 100-mm tin pipe to the upper part of the body, and bring it to the street with the other end. To do this, we make a hole in the wall, which we equip with a fireproof metal cuff. Raise the pipe above the roof, install the protective cap
Step 1 - flushing the gas bottle
Step 2 - preparing the case
Step 3 - making the bottom for the upper chamber
Step 4 - prepare and install the burner
Step 5 - making an oil pan
Step 6 - making the coupler
Step 7 - Provide Oil Supply
Step 8 - arrangement of the chimney
In order for the heated air to circulate around the room, it is necessary to install a heat exchanger. This is a steel pipe with a diameter of 100 mm. The most suitable place is inside the housing, between the burner and the chimney. To hold the flame to the top of the heat exchanger, we weld a metal pad cut from a 4 mm sheet.
We arrange forced air supply using a duct fan. It can be made automatic by applying a thermal relay. To keep the heat better, we put a swirler inside the pipe - a design of two welded metal corners, the shelves of which are cut and turned in the form of blades.

Then from the cylinder from under the freon we make a tank for storage and supply of mining. The advantage of the tank of this design is a needle valve, convenient for adjusting the fuel supply
It remains to make two doors, each of which has nuances. For the upper mandatory part is a strong lock, which provides reliable closing for the period of operation of the furnace. At the bottom of the second door, we make a gap so that air can flow freely into the housing and maintain the combustion of oil.
After manufacturing the furnace, we test. Pour a little oil into the pan, then put the same small piece of sponge soaked in solvent. Set the sponge on fire. The oil warms up, starts to evaporate, a flame appears in the burner.
Through the tube, gradually feed oil to the evaporator. If it is necessary to stop burning, we shut off the mining flow (close both valves). As soon as the residues in the pan burn out, the combustion process will stop.
Schemes and rules for making a stove for working out of the pipe are given here. We recommend that you familiarize yourself with useful information.
Operating and Safety Rules
No matter how much they talk about the safety of makeshift stoves, they remain devices that, if handled improperly, can cause burns or tanning of surrounding objects. As a result, there are a number of prohibitions.
The following actions cannot be performed:
- use other fuels instead of used oil;
- use faulty equipment;
- install a heating device in the room without well-established ventilation;
- light a fire if the stove is not equipped with a chimney;
- block the hole in the burner;
- leave the room with a working stove for a long time;
- place flammable liquids or objects near the heated case;
- Spray oil or water on a hot surface.
Only adults, children or animals are allowed to use the furnace during the operation of the unit.
As an interesting and original example of a working stove, we propose to consider even with the technology of manufacturing a potbelly stove. This is also a very effective model, available for self-manufacturing.
The process of creating and starting a heating device is much easier if all safety measures are taken and the nuances of manufacturing and installation are taken into account. We offer videos with useful recommendations.
Video # 1. How to start the oven:
Video # 2. Overview of the working furnace. Tips for use:
Video # 3. Tips on device and use:
It is quite easy to solve the issue of mining utilization by building a metal furnace in the garage. A home-made heating device that runs on cheap fuel functions no worse than purchased expensive models.
But if you are not confident in your abilities, it is better to seek the help of experienced craftsmen who are closely familiar with the nuances of the manufacture and installation of oil furnaces.
Those wishing to share their own experience in the construction of a stove for working out are welcome to leave comments in the block below. Perhaps you have information on the topic that will be useful to site visitors? Please write in the block below, ask questions, post thematic photographs.